I had the pleasure of collaborating with several Oklahoma wedding vendors recently. We created a modern fall inspired styled shoot at Merrick Hollow. This new Oklahoma wedding venue is tucked in the trees and features a tree growing through the event space. To me it seems, Merrick Hollow is part majestic woodland and part modern elegance.
Danielle of Throckmorton Events led the design. The simple and modern table paired with Anthousia’s flower arrangements made for a luxe and modern fall wedding inspiration. While, Danielle of DVandCo Photography captured the images of the day.
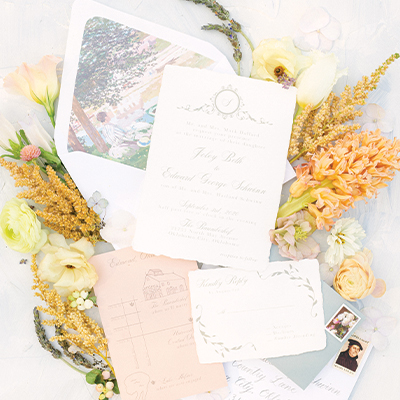
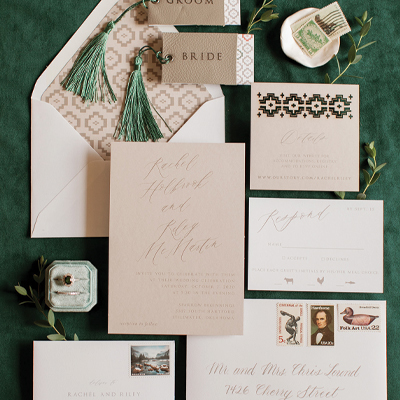
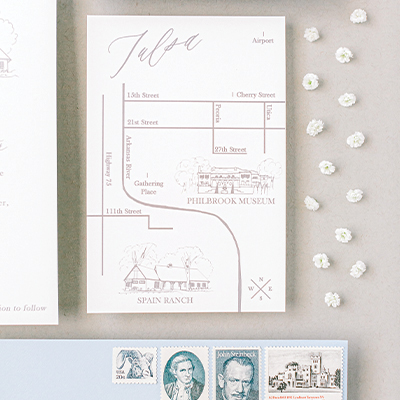
I was so happy to provide an invitation suite full of fall wedding inspiration. I used burgundy font colors for both the invitation and rsvp card. Because I love doing venue illustrations and custom maps, I incorporated a venue illustration and map as part of the invitation suite, too.
Perhaps my favorite part of the invitation suite was the envelope. I used a rich, gold ink for the calligraphy on the address. Then, I finished the envelope with a vintage stamp collage.
Additionally, I loved the invitation suite so much that I added it to the Semi Custom line of invitations. Check it out here if you’re looking for this invitation suite.
Now, see all of the details of this fall wedding inspired styled shoot.


Check out all of the vendors that contributed to this fall wedding inspired styled shoot below.
Venue: Merrick Hollow
Planning/Styling: Throckmorton Events
Photography/Videographer: Danielle Villemarette & Co.
Floral: Anthousai
Flat Ware/Table Decor: Telluria
Table Linen: Marianne’s Rentals
Cake: Amy Cakes
Stationery: The Letter Box
Mobile Bar: Bubbles & Brew OKC
Hair: Brandie Campbell, Owner of Hair + Co
Makeup: Aaliayah Smith
Models: Taiylor Johnson & Geoffrey Johnson
Gown: Leanne Marshall
Tux: The Black Tux
Fall wedding invitations often have deep, rich colors that coordinate with the colors of the season. Danielle Villemarette and Lauren Nickle recently held a photography workshop called The Curated Exposure. They asked me to provide a few fall wedding invitation suites for their participants to photograph. It was fun working with gold, brown, and burgundy colors for these fall inspired invitations.
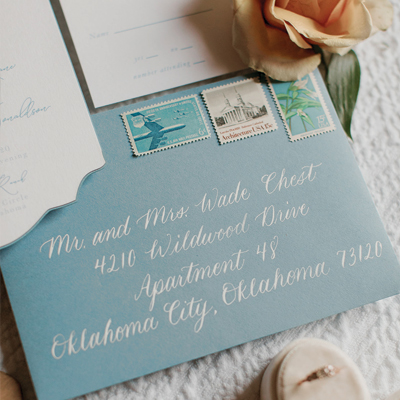
One of the fall wedding invitation suites showcased a clean and modern design. I found inspiration in the colors in the Audrey Hepburn stamp, so I used browns and golds. The envelope liner featured a mustard gold with brown lines that gave a modern feel, while the large swaying fonts added a touch of grace and romanticism. Finally, gold envelope calligraphy and vintage stamps completed the look.

I love handmade papers, so I used ivory handmade paper for the second fall wedding invitation. Because I did not want to take away from the beautiful deckled edge of the handmade paper, the fonts and texts of this invitation remained simple. Similarly, a gold duo gram with leaf detail became the envelope liner. Finally, the gold envelope calligraphy paired with a vintage stamp collage added flair to the invitation suite.

I also prepared menus for the table. These are some of my most favorite menus. I went with a layered design and actually used my sewing machine to attach the place card to the menu with stitches.


This took part at Daffodil Hill in Oklahoma City. The florals are from Poppy Lane Design, and the rentals are from Marianne’s Rentals.
Do you like these invitation designs and want them for your wedding? Both of these designs are part of the Semi Custom Collection! Contact me for more information.

Last week’s Instagram post about envelope addressing etiquette generated quite the buzz. Many people commented and sent messages thanking me for the helpful information.
As a calligrapher, I see hundreds of envelope addresses each month. The etiquette on creating addresses has become commonplace. (Although, it did not start out that way!) Many years ago, I remember googling the following phrases often:
How to address an envelope to
While it takes a little time learning the etiquette “rules”, they are important. Etiquette exists so that we are polite and respectful. Today, etiquette rules are more relaxed than they were decades ago. However, being polite is still in style. Just like sports games have rules, etiquette are the rules for social situations.
Need to know when to use Ms., Miss, and Mrs.? Wondering how to name (or if to name) children? Do you abbreviate street, post office box, or boulevard? All of these questions are answered in the free guide.
In the five page resource, you’ll find a chart, examples, frequently asked questions, and my personal tips for envelope addressing. It is a one-stop guide for your wedding envelope addresses.
Grab the Etiquette Guide below!
[et_bloom_locked optin_id=”optin_2″]
[/et_bloom_locked]
I hope you find the guide useful when putting your envelope addresses together. If you’re looking for invitations or calligraphy, please reach out here or send an email to jill.theletterbox@gmail.com.
Be sure to stay up to date with all of the current happenings related to paper and calligraphy by following us on Instagram: @theletterboxshop
-Jill
RSVP cards relay the final specifics for your wedding. From these cards, you’ll have a final count of the people attending. Here are the top five RSVP card tips, plus a pro tip at the end.

Visit with your caterer and venue to see when they need to know your final guest count. Use this date as a guide as to when you need the reply card back from your guests. Most often the card should be returned about 4 weeks from your wedding date, but destination weddings or weddings around holidays may need more time for planning.
I love a nice dark cardstock with white ink printing, but the RSVP card is not the place for dark cardstock. Most guests have a black ink pen handy to fill in the information on the RSVP card, so make sure your RSVP card is something that can be filled in with a black ink pen. Think light colored cardstocks where the information will be easy for them to fill in the blanks.

Are you inviting the whole family or only adults? One way to inform your guests if their children are invited is to list “___ number of seats have been reserved for you”. You would fill in the number. This communicates how many people from a family you are inviting.
If you are hosting a weekend full of wedding events, word the rsvp with:
Please check all you will attend.
___ Welcome Party (Friday)
___ Wedding/Reception (Saturday)
___ Farewell Brunch (Sunday)
If you’ll be having a seated dinner with menu options, word the rsvp with:
Place each guest’s initials next to his or her meal choice.
___ Beef
___ Chicken
___ Fish
The RSVP envelope should go back to the person(s) that will record the rsvp information. The first line of the address could read any of the following: The Future Mr. and Mrs. Smith, Sarah and Chris, parents names, The Smith Family.
Traditionally, the RSVP card is sent back to the host of the wedding. There is a little bit of variance in this at times due to who will be tracking the rsvp information.

You’ll need to follow up with guests who do not return the rsvp card with a phone call, email, or social media message. Often, life gets busy and some forget to return it. After planning your own wedding, you’ll likely become very timely about rsvp-ing to other events! ?
The last rsvp card tip involves missing names! Many people forget to write their name on the RSVP card, leaving you with little information about who returned it! On the back of each of the rsvp cards, write a number that corresponds with your guest list. That way if someone forgets to write his or her name, you’ll know who returned it.
The RSVP card has many pieces to it and can be very helpful in planning the final few months that lead up to the wedding. It’s from the RSVP card that you will know names for the place cards and seating charts and final counts to give the wedding venue and caterer. Be sure to use theses RSVP card tips to aid you in your final plans.
Are you looking for wedding invitations? Be sure to check out our custom and semi-custom invitation designs. Contact us here for more information. Creating wedding stationery is what we love and we would love to help you design beautiful pieces for your dream day.

Until a few years ago, I had never decorated an envelope or frankly even considered doing anything to an envelope except addressing it. Then, I received a piece of mail that was decorated. This envelope had multiple stamps all in purple shades, large letters for my name where small hand-drawn flowers sat holding the lines of the letters together, and purple washi tape across the center with the writing “kindly deliver to”. That envelope was the first piece of mail I opened that day because it was so fun and elevated my spirit just to see it!
Throughout the years, I have spent time decorating envelopes in a similar fashion. My mantra this holiday season is to spread cheer. If that is your wish as well, consider spending a few extra minutes on your holiday envelopes. It’s a small detail that can really make someone’s day.
Supplies You’ll Need to Decorate Envelopes


Download the envelope template. Cut out the rectangles. Place the template over the envelope. Write the address. Start at the very left on each line to create a stairstep look for the address. Finish the blank space with a simple holly leaf. Color the holly leaf with markers, if desired.
Time: approximately 2 minutes per envelope


Lightly draw three lines slanted on your envelope for the name. Write the name fairly large in marker. With a black pen, add a shadow line to the right side of the letters. Use the envelope template to write the street address and city, state, zip code. Erase the lines under the name.
Time: approximately 4 minutes per envelope

Lightly draw the Christmas light strands on the envelope in pencil. Use red and green markers to color the light strands. Use the envelope template as a guide for straight lines to write the address. Mix and match the writing with cursive and block letters. Erase the pencil lines from the envelope.
Time: approximately 5 minutes per envelope
[et_bloom_locked optin_id=”optin_1″]

[/et_bloom_locked]
Give a few of the envelope designs a try to really spread holiday cheer this year. Tag your pictures of your envelopes @theletterboxshop on Instagram so I can see, too!
Need Holiday Cards to go inside those beautiful envelopes? Our Holiday Card Collection opens November 7, 2019.


I don’t know about you, but I love receiving mail! Snail mail that is. You know the kind with an actual stamp and envelope. It shows someone spent several minutes to think about me or my family and that is what makes it special. One of my favorite times of year to send mail is at the holidays.
We all know what holiday cards are, but here are 5 reasons why you should mail holiday cards this year!
My mantra this year with regards to the holidays is to spread cheer. Life can get heavy with negative messages that bombard us through social media, news, and even friends and family. I generally think of myself as a positive person, but even I come in contact with unwanted negativity. Sending holiday cards is a way to spread kindness and positivity around the holidays. Add some fun stickers and a personalized message to your card to amplify the happiness.
Holiday cards are such a fun time to send pictures of you and your loved ones throughout the year. Yes, we live in such an electronic era that is sometimes easy to see pictures of others. But, it is also fun to actually print out those photos! Sometimes the photos that bring us such joy to view stay in our phones. The holidays are a great time to mail those you care about a nice picture of your crew.

The physical act of sending snail mail shows you put forth extra effort toward someone else. Give someone the “kid in a candy store” feeling when he or she goes to open your card. Cards are small gifts contained in an envelope. We don’t know for sure what’s inside until we open it. Caring for others is what the season is all about and sending mail is a great way to show you care.
Holidays can be stressful. Stressful on many fronts in regards to the heightened busyness or family decisions on where to be when. Taking a few minutes to channel some creativity in the form of decorating holiday envelopes can be a nice break from the holiday stress. You might not have time to specialize everyone’s envelope, but taking a few moments to draw stars or Christmas trees or use a fun style to write someone’s name can be a hiatus from the stress of the season.
5. Connect with others
You probably have a caring circle of family and friends, all of whom you won’t likely get to see during the holidays—due to scheduling or distance. Mailing holiday cards allows you to connect with those you won’t see and share with them a holiday message.
Spread cheer, connect with others, and give someone “the kid in the candy store” feeling when they go to open the holiday cards you’ll send this year.
Need Holiday Cards to Mail? Set a reminder for Nov. 7, 2019, when the Holiday Card Collection will open for orders. (I hear there is going to be a special offer 😉

Date selected. Venue booked. Photographer chosen. Invitations ordered.
Look at you go. You have accomplished so many tasks related to your wedding, and now you have one more item: acquiring addresses for all of your guests.
You text message friends and family for their addresses; ask your parents and future in-laws for addresses; and send reminder texts to your friends and family for their addresses.
Once you finally compile your address list, you begin wondering how exactly to go about addressing your invitations. You see a list composed of doctors, couples who aren’t married, families, and apartment numbers.
No fear! Now that you have the addresses, here is the Stress-free Guide to Envelope Addressing Etiquette! In this three page handout, you’ll get access to the most common envelope addressing situations.
(Your guide will be emailed to the email address you provide above.)

It’s as easy as finding the category and replacing your address information to it. Maybe you’re needing more information or wanting your addresses done in calligraphy. Envelope calligraphy is my specialty and the best way to make your guests feel extra special when they open that invitation.
Feel free to email me at jill.theletterbox@gmail.com to inquire about an envelope calligraphy order.
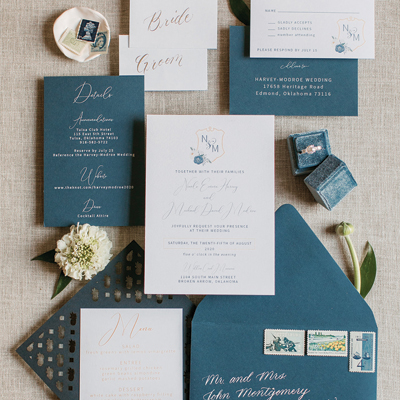
As I get the mail for the day, I notice it. It’s stuck in between bright flyers and generic envelopes. The paper feels sturdy and smooth; the color entices me to it. It is a beautiful navy envelope with white ink addressed to me! The most beautiful piece of mail I’ve ever received lies in front of me, and I feel excited about opening the envelope to see what is inside. Someone has turned the mundane task of getting the mail into a compelling moment in my day.
Creating memorable mail doesn’t happen without planning. And what makes something stand out among the rest is usually in the details. It might be the details of quality, or the details of personality, or the details of accessories, but details are what make stationery special and memorable. If you’re looking to send memorable mail, here are a few details that are sure to excite the recipient. (Be sure to check the printable list at the end of the post, too!)
This invitation suite encompasses so many details and serves as an example of memorable mail! From the hand painted gold leafing to the envelope calligraphy along with the envelope calligraphy, this black and white invitation showcases details.

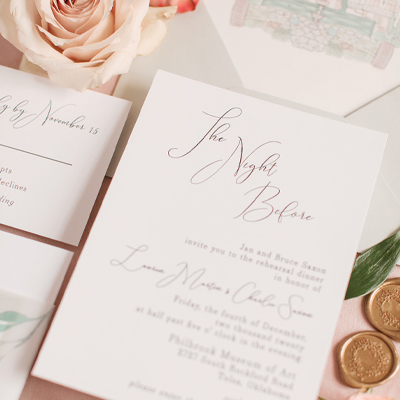
Wrapping up the invitation bundle with vellum is a classy way to add excitement to your mailing. The recipient gets to unwrap the contents much like a present. Including a belly band, in this case coordinating string, incorporates a movement that is not associated with opening mail and makes your mail stand out.

This multi-part invitation features a watercolor painting as a background with a vellum invitation over it. It is bundled together with coordinating silk ribbon. Quality silk ribbon comes in many colors and adds dimension to your invitation and mail.

A selection of vintage stamps mixed with calligraphy can really set your mail apart from the rest. Vintage stamps come in many colors and themes and can be mixed and matched with current USPS stamps, too. Who doesn’t feel special when an envelope done in calligraphy shows up, too?

There are several more details you could include in your invitations. Print the list Invitation Details for Memorable Stationery and begin sending memorable mail!

As I open the navy envelope with white ink addressed to me, I am met with a wax seal on the back of the envelope. I can tell this is going to be something special inside. Next, I see a navy silk ribbon that is holding several pieces of paper together. The details have created a pleasant and memorable experience out of opening this piece of mail. I’m likely not to forget about RSVPing for this event because I can see someone has put lots of thought into it.
Let me know of your favorite details to add (or receive) to your mail!
-Jill
Brush calligraphy is a modern script that is similar to calligraphy with one main difference–the pen. Traditional calligraphy uses a dip pen or oblique pen and nibs and ink. Brush calligraphy uses a pen that more closely resembles a marker–albeit a special marker that allows for differences in pressure so that one can achieve thin and thick strokes. Letters are formed in similar ways in both brush calligraphy and calligraphy, with many strokes making up each letter. I find brush calligraphy to be a bit more “learner friendly” because the tool to create it is a marker, and that is more commonplace than a nib and a bottle of ink. However, once you learn either calligraphy or brush calligraphy, I find it easy to switch between the two methods.
If you’re wanting to learn how to write in brush calligraphy, you might consider taking a class. I have taught several classes on brush calligraphy in the NW Oklahoma area, and here is a look at what happens at a brush calligraphy class. Upon arriving, you’ll notice the supplies for the workshop. While these can vary depending on the class, you’ll likely see two different sized brush calligraphy pens and a workbook. I have created my own workbook using my own lettering style to teach the class.
First, we learn the basics of brush calligraphy. I show how to hold the pen and go over simple strokes to make with the pen. Then, we slowly and thoroughly learn to write each letter of the alphabet. I provide breaks in-between letters because you might feel hand-fatigue if you’re not used to writing for several minutes at a time. We then advance to lettering words.
Here are some words from past participants on the Brush Calligraphy Classes.
Here are some pictures from a Brush Calligraphy Class in September of 2017. Photography by SAE Photography in Woodward, OK.


Visit the Workshop Page to see if any workshops are on the schedule.
I announce classes I’m going to teach on my Facebook page, Instagram, and through email. You can subscribe for the infrequent, only important information emails here and be the first to know about upcoming workshop dates.
Enjoy!
-Jill
As a kid, my summers were full of workshops-cooking workshops, sewing workshops, arts and craft workshops, workshops on bicycle safety, outdoor camping, babysitting and more. So, when summer rolled around I knew I wanted to offer my Beginner Brush Calligraphy Workshop to kids! The day was divided into two classes, one class for middle school aged students and one class for high school aged students. These workshops were so fun! We began with learning to write the alphabet in brush calligraphy and then finished the class with a watercolor sign, where students penned a motivational quote lettered in brush calligraphy. Look out world, these kids have talent! (And #fail moment, I didn’t get a picture of all the finished signs!) Enjoy a few pictures from the youth class below.


July also saw a private party with a group of friends getting together to celebrate a special birthday! The Brush Calligraphy Class began with the basics of how to hold the brush calligraphy pen and a brief overview of brush calligraphy. We then jumped into drills and learning the lowercase alphabet before learning how to string letters together to form words. We finished this class with a chalkboard, where attendees wrote a quote in brush calligraphy. (I’m learning I need to take more pictures! I only took one at this private party!)

As the carefree days of summer draw to a close with the first day of school approaching, I wanted to give out this freebie! It is a back-to-school themed, printable brush calligraphy worksheet! Feel free to download the Back to School Brush Lettering worksheet and print it. If you need more or new Tombow Dual Brush Pens, you can order them from my website here. My website offers free delivery in Woodward, OK or I can always ship them to you, as well! Use code: 4FOR12 to get four pens for $12.

More workshops are planned for the fall. Currently, ONE seat remains open for the September 14, 2017 Beginner Brush Calligraphy Workshop in Woodward, OK. You can register here.
If you have questions about classes or anything hand-lettered, send me an e-mail at jill@theletterboxshop.com
Enjoy!
-Jill